Recently I have been hearing about how it’s hard to break into the hiking world because of all the fancy gear you need to start, and I am here to tell you that is so far from the truth. One thing I love about hiking is that almost anyone can do it and it is virtually free!
The majority of the things you need to start hiking you likely already have at home and the rest can be picked up cheaply if you are willing to look for sales and second-hand items. Some things I will assume you already have as they are generally considered household items and I will not count them as a cost. Depending on where you live and what you already have you could start hiking for next to nothing.
This guide is for someone new to hiking and therefore I am making the assumption that you are going in the summer when you won’t have to deal with snow or bad weather, and you are going to be going on a fairly well-traveled trail so you don’t have to worry about getting lost.
I admit, if you are going on a multiday trek, going into deep wilderness, or going in the snow the costs of hiking can go up steeply due to safety gear and needing lightweight camping items that you can carry on your back. Most people do not take their very first hike under these conditions, and just regular summer day hiking is so much fun anyway. Please, take your first hike somewhere you know will be beautiful on a great sunny day where the terrain isn’t super hard to navigate, that way you can fall in love with it and the harder hikes will grow on you with time.
This article is broken up into three main sections that I believe are the main barriers to the outdoors:
1. What to Wear
2. What’s in Your Pack
3. Transportation
Bonus Section: Tips, which is mostly about how to do research and be mentally prepared for a hike, which is free; though I am assuming you have internet access, and preferably a smartphone.
Everything in this article is written in Canadian dollars (CAD) if you are from the USA, congrats! You get an instant 30% off!
What to Wear Hiking
Table of Contents
This section could cost $0 or it could cost hundreds of dollars depending on what you have in your closet and how fancy you want your gear to be.

Clothes – you can wear anything you want on a hike, do not worry about fancy spandex or Gortex jackets, wear something that you are comfortable in, and dress in/pack layers. I have been hiking in jean shorts and a T-shirt many a time.
Sweat-wicking clothes are great but not necessary. Make sure you pack a warm hoodie in your pack because the top of the mountain can get cold and windy. I’ve written another article about trying to avoid wearing jeans and pants alternatives here.
One pro tip is to bring an extra pair of socks, if your socks get wet from sweat or stepping in a puddle it will be uncomfortable and you will be more prone to blisters. There shouldn’t be any extra costs here.
Rain Gear – very optional, if the weather forecast is clear don’t worry about it, but if you are worried and don’t want to buy a rain jacket you can toss a large plastic garbage bag in your pack instead, it will work for a short hike when you are caught in bad weather unexpectedly; therefore, I will not add a price tag to this one.
Sun Protection – This is optional but wearing a ball cap or sunglasses to protect your eyes makes taking in the views so much better. I assume most people already own one of these and it’s optional anyway so I’m not going to add a cost.
Shoes – here’s where the clothing section can get expensive or be free.

You do not need fancy hiking shoes, though in the future you will likely want to buy some after you have gotten hooked on hiking. For now, honestly, any tennis shoes that tie-up, are closed-toed, and have a decently thick sole will do the trick. I have been hiking in my old beat-up converse many times or my running shoes.
Take a look at the tennis shoes you have at home and check to see if the sole is bendy or stiff, the stiffer the better, you don’t want to be wearing little slippers in the woods and be getting bruises on the bottom of your feet every time you step on a rock. Also, check to see if the tread on the bottom of the shoe has worn off or not. Finally, be sure to lace your shoes up tight!
If you have half-decent runners at home then this section costs you $0 extra, if you need to buy new shoes then this could cost you almost anything. My current hiking shoes I bought on sale at MEC for $150, but the ones I owned before that I bought on clearance during an additional 50% off sale at Marks for $25. It is very possible to find cheap hiking shoes or just regular tennis shoes, these will just wear out faster and take a little time to find good sales.
A Backpack – this one, like shoes, can be tricky. If you have a backpack at home, any kind at all, use it. Just make sure it doesn’t have any holes in the bottom first. If you don’t have a backpack you can find one at a thrift store for about $10 or you can get a brand new one from places like Mountain Wearhouse or Walmart for $15! Super cheap! Of course, these packs will not last you forever, but they will be great for getting you started.
If you have some extra money to spend or have found a good selection of well-priced bags I would strongly recommend looking for ones that have chest and hip straps, these straps buckle in the front of your body and take a lot of pressure off your shoulders, making it easier to carry the weight. If this isn’t available that’s okay too!

You are going to be looking for a pack that’s about 30 liters in size, give or take a few liters, approximately the same size backpack that you might have taken to school as a kid, standard backpack size.
I own two daypacks, one that was a gift and it’s a very good bag from Arcteryx, it has some waterproofing, chest and hip straps, and very comfortable shoulder and back padding and I have had this backpack for over ten years! It is incredibly comfortable and shows no signs of falling apart anytime soon. These packs usually go for about $150, and luckily mine was gifted to me, but if I had gone through 1 $15 backpack per year for the last 10 years, it would be the same price.
The other backpack I own is a smaller pack that I bought at a flea market in Colombia for $10 and it works fine for short trips but some of the seems are already ripping and I’ve only had it for a year. Quality does make a difference when it comes to backpacks, but don’t let that get in the way of starting to hike, a cheap one works just fine.
This part of the gear could cost nothing if you already own a backpack to up to $150.
Overall, this section could cost you $0 if you have shoes and a backpack already, If you don’t this section will probably cost you $50 or more.
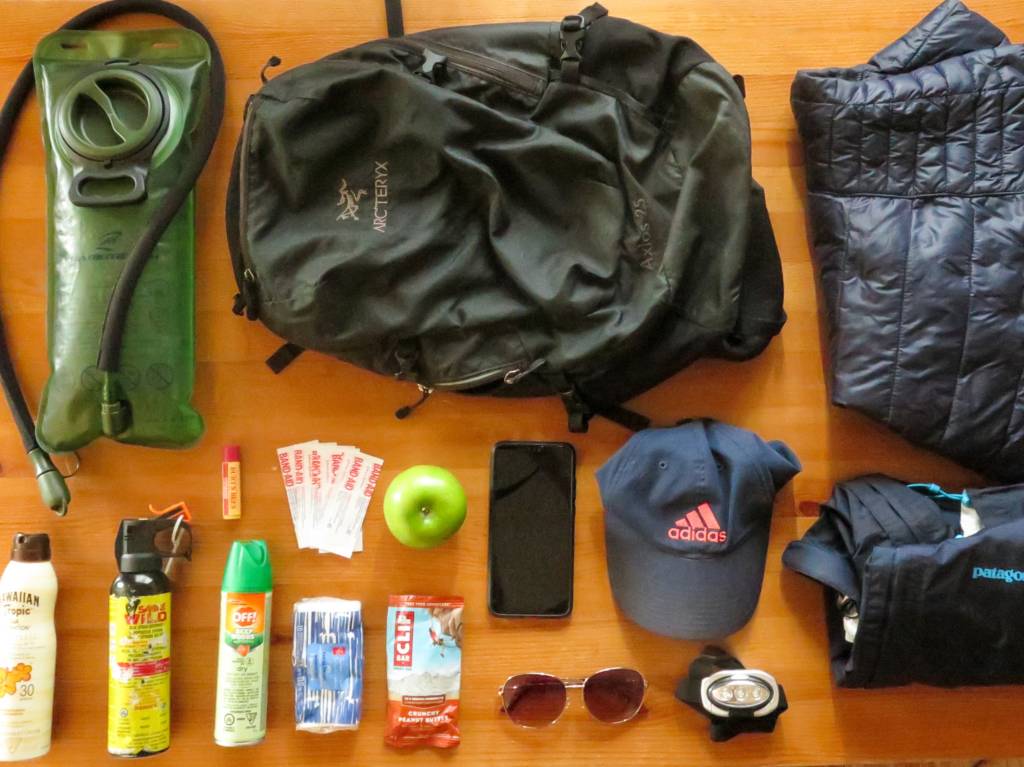
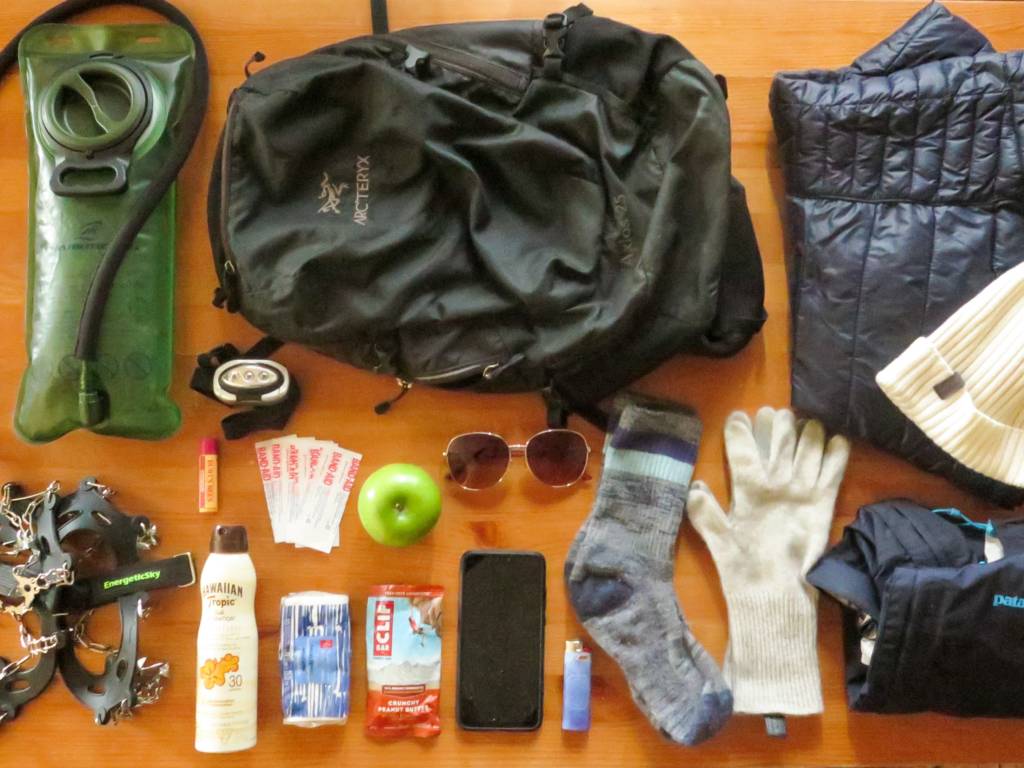
What to Take in Your Backpack Hiking
I have a full gear list on what I keep in my summer day pack here, but I want to go through a few to let you know how much everything costs.

Things you probably already have around the house, therefore, I am considering to be “free”: band aides (for blisters and other small cuts), a lighter or matches (a fire starter in case of emergency), sunscreen, bug repellant (optional, location and weather dependent). Some other things I like to bring that are optional are tissues and Chapstick.
Water! The most important thing you can bring on a hike. I now carry a 2-liter water bladder which has been awesome, I bought it for $15 online, but you can use whatever water bottle you have at home.
You can buy plastic reusable water bottles for only $5 or so nowadays, or you can buy a single-use bottle if need be.
Bring LOTS of water, more than you think. Bring two water bottles if you only have smaller ones. There’s no need to invest in a water filtration system when you are going on beginner day-hikes.
Food – bring a lunch or a snack. I would strongly recommend bringing a full lunch, hikes are harder than you think and you will use up a lot more energy than you expect. Just bring some granola bars or a sandwich, anything you have at your house. Find my list of favorite hiking lunches here. I am not going to add this to the list of costs as food is a normal cost of living.

Headlamp/Flashlight – there is a good chance you have a portable light in your house somewhere, this is just a good precaution to have in your pack in case you have to end up hiking in the dark. A headlamp costs about $10 and you can buy a small flashlight at the dollar store.
Bear Spray – here is the big cost on this list! A canister of bear spray usually costs $50 and you have to buy them new because they expire. There is no way around this cost unless you live somewhere that there aren’t any bears. If you are going with a friend that has bear spray and you stay together the whole time you should be okay to just use your friend’s bear spray if needed, but I would recommend having your own.

Bear spray is an absolute must in the wilderness and it is a way to keep you safe but also show respect to nature. If you come across a bear act big, be loud, and back away slowly. Keep an eye out to see if the bear has cubs, if you are separating the bear from the cubs get out of the way ASAP. If the bear does not run off then you take out your bear spray and spray it towards the bear, you have to be fairly close to the bear to make it work. Do not use the spray as a repellant on yourself like you would for bug spray. Think of it as a sort of strong pepper spray.
Keep the spray in a holster on your belt or in an easily accessibly outside pocket of your bag, make sure you can reach it without having to open pockets or take the pack off.
Bear spray does not hurt the bear, only scares it and makes it runoff, it works much better than a gun which is not fail-proof if you are considering that option instead.
Other ways to be bear-aware are to talk on the trail to your friends, call out every once in a while, clap, or sing or whistle. Letting the bear know where you are is the best bear repellant there is.
Let others on the trail know if you have seen a bear in the distance and if you continually come across bear scat, it might be a good sign to turn around and go home for the day.
If you don’t live in bear territory, congrats, you get to save $50!
You can find bear spray at a store like Canadian Tire, MEC, REI, and Cabela’s, You have to register for the bear spray so it has to be purchased in person.
Transportation
When I think about barriers to the outdoors transportation is usually the one that looms largest to me. It seems impossible to get out into the mountains without a car, and in some cases that might be true. However, there are some great options to research in your area to see if some of these other options are available to you.
Bus/Shuttle – if you live in a metropolitan area that is close to the mountains you might be able to take a regular city bus to a trailhead, or at least very close to a trailhead. Here in Vancouver, there are quite a few and I have compiled a list of them here if you want to check it out. Other cities likely also have this.
There are also a lot of national parks or mountain resort areas that offer free or very affordable shuttles for people to get around to different parts of the park, one of the best places I have seen this done is in Glacier National Park, but I have seen it other places as well.
Cost addition here is probably around $5 depending on bus costs in your area.
Join a Hiking Group – if you are in a more rural situation and there isn’t public transport available then a good option is to go online and try to find a local hiking group through sites like Meetup or Facebook. They will frequently have group hiking trips that you can sign up for and get a ride from one of the other group members.
Remember to always offer gas money to the person driving you, that could be as little as $5 if the car if full and the hike is close, or up to $20. Always offer, even if the driver refuses, and if they do refuse, it is nice to try to treat them to something if you have the chance like a coffee or a beer.

Rental Car/Car Share – this is another one that only works if you live in a city. Here in Vancouver, we have a car share program where you can rent the car by the minute or you can take one for the full day if you are heading out on a full-day excursion which can be up to $90 per day. Do some research and find one that suits you best.
Tips/Research
Do Your Trail Research – I like finding new trails on AllTrails, which you can use on a desktop or also as an app. It tells you the length and approximate time of the hike, and you can read recent reviews to know various things such as if the trail is snow-free or if there has been recent bear activity. (If you are in the Vancouver area my list of hikes ranked by difficulty might help you as well, you can find it here.)
You can pay an annual membership to download maps from the app onto your smartphone for offline use, but one hack is that you can download the map on your desktop for free, and if you are logged into your account on both devices the map should still show up on your smartphone no matter if you have service or not. Another popular app that is free for trail mapping is called Gaia.
Of course, also research the weather and consider the recent weather patterns in the previous days.
Another part of the research is checking to see if you need a permit for the hike, most of the time you do not, but sometimes there is a parking permit or the area is only allowing a small number of people in to allow restoration time or it’s inside a national park. A quick google search should let you know any information you need about permits.
Follow Leave No Trace Principles – These principles include pack in and pack out everything (that includes things like apple cores that you think belong in nature), don’t feed wildlife (it’s bad for them), don’t leave the path (within reason) and don’t move or pick things you find in nature.
These principles also include some etiquette like keep your dog on a leash, say hello to your fellow hiker and allow the person going uphill to have the right away on the trail, don’t play loud music (people are in nature to enjoy it as it is), and split into smaller groups of 4 or less if you are arriving in a large group.
Just be kind and considerate of nature and your fellow hiker. Remember the classic saying of “take only pictures, leave only footprints”.
Safety – I have listed quite a few safety items above such as bear spray, a headlamp, and a fire starter, but there are some other things you can do to keep yourself safe on the trail as well.
Always tell someone where you are going and when you will be returning. If you are lost this will significantly enhance your chance of survival and of search and rescue finding you.
Your cellphone is a lifeline. If you are lost or hurt call 911 immediately, they can then easily track your cellphone and find you. Your cellphone can be tracked even in airplane mode, just keep it on.
Don’t Leave Valuables in Your Car – Unfortunately, trailheads can be a popular place for car break-ins as thieves know that there are not usually cameras and that the owners will likely be gone for several hours.
Just don’t leave anything valuable in the car and they won’t have any reason to break in. The less they get something from a car, the more discouraged they will be, and the fewer break-ins there will be overall.
Ask Your Hiking Friends – Ask around to the people in your life that like to hike. Chances are they are bursting at the seems with knowledge, funny stories, and potentially even gear they are willing to lend/give to you. They also probably can’t wait to invite you on their next hike now that they know you are into it as well! If there’s no one in your life that is into hiking, there are lots of hiking groups online that you can join and ask for advice.
Conclusion
I could probably keep writing this article forever, but I think I gave you a pretty good round-up of how to start hiking, and likely with whatever you already have in your closet, but let’s do a quick roundup of prices and items.
Clothing: $0 up to $300, but likely maxing out at about $50 if you are willing to look for sales and secondhand items. Things you are more likely to need are shoes and a backpack.
Gear: inside your pack, the only big cost is bear spray at $50. Things you are less likely to already own are a reusable water bottle, and a light, both of which can be purchased quite cheap, ranging from $5 to $30+
Transport: Even if you have a car you will still be paying for gas, and if not, other options include a bus pass, joining a hiking group, or getting a rental car for the day. These prices could be anywhere from $5 to $100 depending on your choice.
Information: free.
Overall, if you live somewhere without bears, there is a good chance you already have all the gear you need and the only thing you need to consider is transportation, which could only cost you a few dollars.
If you live somewhere with bears, starting to hike would start at $50, then add on transportation and any other small items you might need.
Walking in the woods is free! Please don’t let these big fancy outdoor gear companies scare you into thinking you need the newest and fanciest gear to walk up a hill.
Get out and explore and happy hiking!


Welcome to Alpine Feeling! My name is Talon, an outdoor enthusiast who has spent extensive time in the mountains of Vancouver, Washington State, and the Canadian Rocky Mountains.